Introduction
We all, at some point of time in our learning journey, have dreamt of building a cool project. Only understanding the theory and not applying it on pratical projects is very bad because with time, we tend to forget things. But if we apply it on some kind of pratical/projects, try to deploy them, and learn from them, it will not only help us to learn more but others also about learnong something new from your work. Who knows you might inspire someone to take up a new learning path. Moreover, working on specific domains like NLP gives you wide opportunities and problem statements to explore.

Through this article, I wish to introduce you to an amazing project, the Language Detection model using Natural Language Processing. This will take you through a real-world example of ML(application to say). So, let’s not wait anymore.
About the dataset
The dataset used in this project is the Languse detection dataset, which contains text details for 17 different languages.
English
Portuguese
French
Greek
Dutch
Spanish
Japanese
Russian
Danish
Italian
Turkish
Swedish
Arabic
Malayalam
Hindi
Tamil
Telugu
Using the text we have to create a model which will be able to predict the given language. This is a solution for many artificial intelligence applications and computational linguists. These kinds of prediction systems are widely used in electronic devices such as mobiles, laptops, etc for machine translation, and also on robots. It helps in tracking and identifying multilingual documents too. The domain of NLP is still a lively area of researchers.
Implementation
You can find the complete code implementation at my Github repo
Let's get started.
First of all, we will import all the required libraries.
pandasfor data manipulation and analysisnumpyfor operations on arrayrefor data cleaning using Regexseabornandmatplotlibfor visualization
import pandas as pd
import numpy as np
import re
import seaborn as sns
import matplotlib.pyplot as plt
import warnings
warnings.simplefilter("ignore")
Now let’s import the language detection dataset
data = pd.read_csv("Language Detection.csv")
Separating Independent and Dependent features
Now we can separate the dependent and independent variables. Here, text data is the independent variable and the language name is the dependent variable.
X = data["Text"]
y = data["Language"]
Label Encoding
Our output variable, the name of languages is a categorical variable. For training the model we should have to convert it into a numerical form, so we are performing label encoding on that output variable. For this process, we are importing LabelEncoder from sklearn.
from sklearn.preprocessing import LabelEncoder
le = LabelEncoder()
y = le.fit_transform(y)
Text Preprocessing
This is a dataset created using scraping the Wikipedia, so it contains many unwanted symbols, numbers which will affect the quality of our model. So we should perform text preprocessing techniques to remove all the unwanted .
# creating a list for appending the preprocessed text
data_list = []
# iterating through all the text
for text in X:
       # removing the symbols and numbers
        text = re.sub(r'[!@#$(),n"%^*?:;~`0-9]', ' ', text)
        text = re.sub(r'[[]]', ' ', text)
        # converting the text to lower case
        text = text.lower()
        # appending to data_list
        data_list.append(text)
Bag of Words
As we all know that, not only the output feature but also the input feature should be of the numerical form. So we are converting text into numerical form by creating a Bag of Words model using CountVectorizer.
from sklearn.feature_extraction.text import CountVectorizer
cv = CountVectorizer()
X = cv.fit_transform(data_list).toarray()
X.shape # (10337, 39419)
Train Test Splitting
We preprocessed our input and output variable. The next step is to create the training set, for training the model and test set, for evaluating the test set. For this process, we are using a train_test_split from sklearn's model selection.
from sklearn.model_selection import train_test_split
x_train, x_test, y_train, y_test = train_test_split(X,
                                                    y,
                                                    test_size = 0.20)
Model Training and Prediction
And we almost there, the model creation part. We are using the Naive Bayes algorithm for our model creation. Later we are training the model using the training set.
from sklearn.naive_bayes import MultinomialNB
model = MultinomialNB()
model.fit(x_train, y_train)
So we’ve trained our model using the training set. Now let’s predict the output for the test set.
y_pred = model.predict(x_test)
Model Evaluation
Now we can evaluate our model
from sklearn.metrics import accuracy_score, confusion_matrix, classification_report
ac = accuracy_score(y_test, y_pred)
cm = confusion_matrix(y_test, y_pred)

print("Accuracy is :",ac)
# Accuracy is :  0.9787234042553191
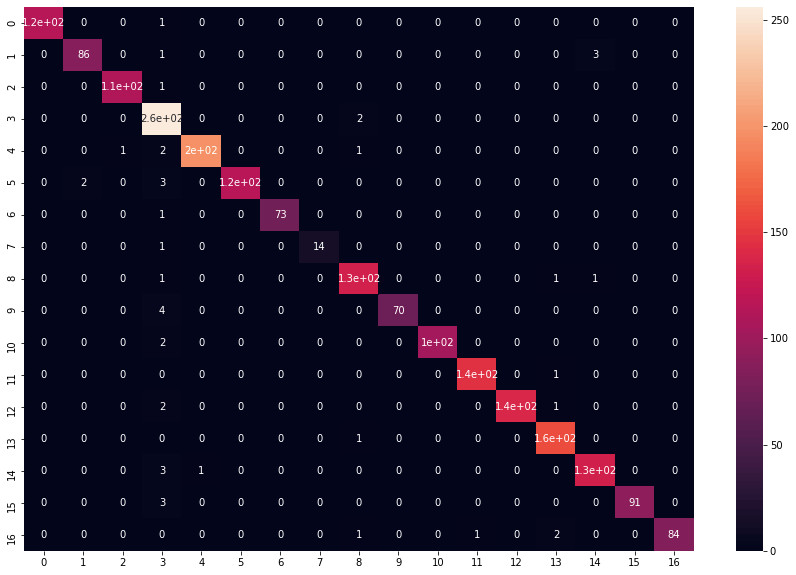
The accuracy of the model is 0.97 which is very good and our model is performing well. Now let’s plot the confusion matrix using the seaborn heatmap.
plt.figure(figsize=(15,10))
sns.heatmap(cm, annot = True)
plt.show()
The graph will look like this:

Predicting with some more data Now let’s test the model prediction using text in different languages.
def predict(text):
     x = cv.transform([text]).toarray() # converting text to bag of words model (Vector)
     lang = model.predict(x) # predicting the language
     lang = le.inverse_transform(lang) # finding the language corresponding the the predicted value
     print("The langauge is in",lang[0]) # printing the language
predict("Welcome to sharad mittal's blog")
#The langauge is in English
predict("मित्तल के ब्लॉग पर आपका स्वागत है")
#The langauge is in Hindi
predict("Καλώς ήλθατε στο blog του sharad mittal")
#The langauge is in Greek
This is how we can predict the language of a given text.
This is all about the creating a Language Detector using NLP. That's it! simple, isn't it? Hope this tutorial has helped.
In my next few posts, i will be writing about how we can create a web app using streamlit for our model and how to host the app on a platform like Herkou
You can play around with the library and explore more features and even make use of Python GUI using Tkinter.
You can find all the code at my GitHub Repository. Drop a star if you find it useful.
Thank you for reading, I would love to connect with you at LinkedIn.
Do share your valuable feedback and suggestions!
